Why are we here?
Pardon the philosophical headings, they make writing blogs interesting for me.
You might have came across some GitHub profiles with a counter that keeps track of how many visits did that page got.
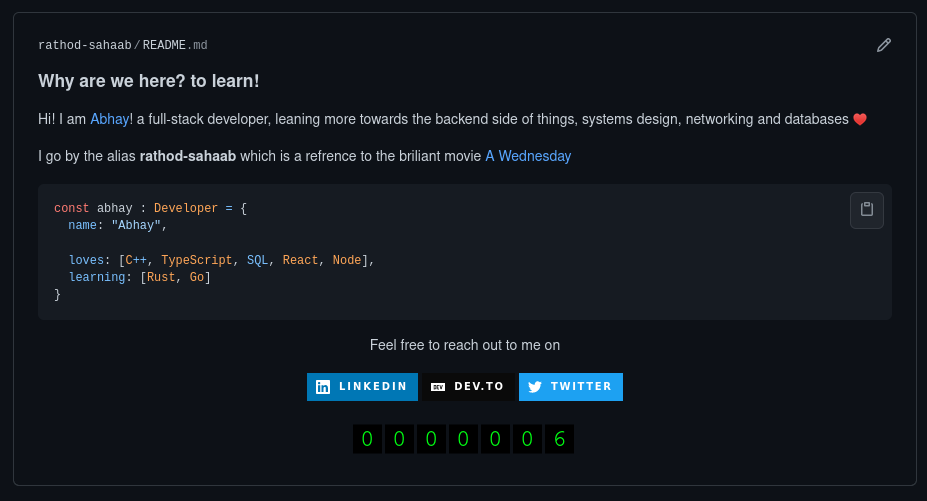
As you can see in the image above the counter at the bottom shows 6 i.e. there have been 6 visits to the page. To see the current value go to my GitHub profile.
Number of visits to this blog page.

We will learn how can we make our own and some hacks to increase the counter. You can find the source code on the github repo backend-basics.
How does it work?
Simple, we use the the good old AJAX/fetch request. Yeah, about that, see we can’t have JavaScript on GitHub or any sane site where users can post things that will be shown to other users (usernames, blogs, etc.). Because of bad things called XSS or cross site scripting. If someone is able to run JavaScript by posting they get almost full control over user’s browser. At best you get some good kid making auto starring repositories or auto tweeting tweets, at worst, anything is possible.
That is the reason we can’t have the good old AJAX/fetch request, dang it! can’t even say AJAX/fetch. Jokes aside, we had to find a way around this to display dynamic content, and someone did.
Images
A picture something-something a thousand words…
– Not me
We all know and love images, they make our websites beautiful and are almost always receive by a seperate GET request that fetched the page which contained the image.
what I mean by that, is, let’s say you request for page example.com/index.html
<html>
  <head>
    ...
  </head>
  <body>
    <img src="example.com/image.png" alt="png" />
  </body>
</html>
your browser will first a request to get index.html
GET /index.html
then a request to get image.png.
GET /image.png
NOTE: The “seperate request” part is less true of HTTP 2 with server push than for HTTP 1.1 but that’s for another day.
It’s not required to import image from the same domain you can also do given that your server send appropriate CORS headers.
<!-- example.com/index.html -->
<html>
  <head>
    ...
  </head>
  <body>
    <img src="realimage.com/image.png" alt="png" />
  </body>
</html>
This doesn’t have to be a static image at all, you can paint every pixel of a 4K image and send it when you like! But do it before request is declared TIMEDOUT by the browser, so yeah not THAT lazily.
Hence, we can generate image on our server and send it when requested, it may take some time to load, but hey! atleast we got it dynamic. What should we generate? let me think… Idea! a visits counter :D, wait -_-.
The idea is not very new and is surely not a result of GitHub profile thingy. Remember those build passing badges they use the same principle.
Full disclosure that badge is stolen from Hugo, the tool I used to make this blog! checkout this blog’s theme.
SVG: Scalable Vector Graphics
Painting pixels is hard, that’s why you need whole another computing device called GPU. If you want to host your backend in the cloud and need a GPU that’s going to cost lot more than just a CPU and rendering images with CPU alone is slow. Not that the GPU would be worth or even effective for the purpose of a counter with width and height of at most 300 pixels.
Because rendering images i.e. painting pixels is slow, our requests will have more latency, throughput will be less and other bad things I cannot make up remember.
Luckily, smart people came up with a better image format , the SVG. What is SVG you ask? SVGs are just texts that tells the drawing program (here, the browser) what to draw.
<svg height="100" width="100">
  <circle cx="50" cy="50" r="42" fill="teal" />
  <text
  	x="50"
	y="57"
	text-anchor="middle"
	fill="white"
	font-family="sans-serif"
	font-weight="bold"
  >
  	%s
  </text>
</svg>
In the code above, we tell the drawing program(the browser) to make a SVG image 100x100 in size and a teal colored circle with x-center at 50, y-center at 50 and radius 42, after that write %s on that circle.
What else? Sky is the limit! check out this blog post by stackfindover. Want to make some cool svg art, checkout OpenSource application Inkscape.
But, why use SVG? Because SVG is just text manipulating SVG and changing it’s value is super easy and fast. So, the answer is performance.
You may be wondering why %s? Our original goal was to make an image with count written on it, obviously we should write in text tag but how to we get that?
If you ever programmed in C you may have came across printf what it does is replaces placeholder with actual data and print it we use it like.
printf("Hi! I am %s.", "Abhay");
// prints: Hi! I am Abhay.
Here % denotes that this it is a placeholder and s denotes it’s placeholder for a string, in this case Abhay.
Well, now we can finally write some code.
Making the visit counter SVG
Our svg template roughly looks like
<svg>
	<circle/>
	<text> %s </text>
</svg>
If write it as string, in minified form we get
const template = "<svg> <circle/> <text> %s </text> </svg>";
And then we use our good friend sprintf-js
let count: number = 6;

const result = sprintf(template, count.toString());
// result: <svg> <circle/> <text> 6 </text> </svg>'
Abhay, we should use %d for integers. Yes! we should but we may want to represent number in our own custom format, example:
And for that using strings are less hassle. In Twenty one we insert svg code below in place of %s.
<tspan text-anchor="middle" x="50" dy="-0.6em">Twenty</tspan>
<tspan text-anchor="middle" x="50" dy="1.2em">one</tspan>
This wouldn’t have been possible with %d and we had to modify svg everytime we wanted to change how output looks.
Abhay, but you could have easily used JavaScript string substitution.
const counterSvg = `<svg>... ${count}</svg>`;
Of-course, but no. The thing is we rarely write SVGs by hand, mostly we use programs like Inkscape to create SVGs. so we don’t have the svg as string in our program to add ${expression}.
We load our image at startup from a file and store it in a string, that’s why we need sprinf to format an already existing string.
What my svg template looks like, which I made using Inkscape.

Finally, making the server
A simple Node express server looks like.
// src/server.ts
import * as express from "express";

async function main() {
  const app = express();

  app.listen(3000, () => {
    console.log("Server started");
  });
}

main();
Abhay, we don’t need a main function! yes but most of the time we do, so database connection functions are async and we have to await them, but we can only use await in an async function. Thus it’s good to know about this pattern.
SVG handler
// src/server.ts
let count = 0; // store in file/DB for persistence
app.get("/svg", (_, res) => {
  count++;

  res.setHeader("content-type", "image/svg+xml");
  res.send(createCounterSvg(count));
});
we set header content-type: image/svg+xml and send whatever createCounterSvg(count) returns, clear by name it returns counter’s svg with count in it.
You might have noticed we use /svg and not /count.svg that is to reinforce the fact that extension does not matter here content-type: image/svg+xml matters the most. Your image tag will look like.
<img src="http://example.com/svg" />
or in markdown

createCounterSvg
It’s a function that returns SVG image with counter value replaced.
// src/create-counter-svg.ts
import * as fs from "fs";
import { sprintf } from "sprintf-js";

const SVG_TEMPLATE = fs.readFileSync("./counter-optim.svg").toString();

const createCounterSvg = (count: number): string => {
  return sprintf(SVG_TEMPLATE, count.toString());
};

export default createCounterSvg;
First we read the file counter-optim.svg using
const SVG_TEMPLATE = fs.readFileSync("./counter-optim.svg").toString();
The file is read only once and then stored in the memory.
When we call createCounterSvg it call sprintf for us and we receive the final svg as a string.
Testing it out
We need some thing that requests the image so we can display it right. So we server index.html from our server
// src/server.ts
app.use(express.static("public"));

app.get("/", (_, res) => {
  // serve index.html
  res.sendFile("index.html");
});
and our index.html looks like
<!-- public/index.html -->
<!DOCTYPE html>
<html lang="en">
  <head>
    ...
    <title>Visits SVG demo</title>
  </head>
  <body>
    <h1>This displays the svg for visits</h1>
    <img src="http://localhost:3000/svg" alt="SVG image for visit count" />
  </body>
</html>
Voila! it works!
Screenshot
CORS
It only works for localhost:3000 and when deployed and you try to request the svg from a domain other than where svg server is hosted you will get CORS errors in your browser.
To fix that we must send access-control-allow-origin header. We can either add the header manually or use the package cors. Using the package cors is better to the serve needs of a real project, so I will be doing that here too.
// server.ts

import * as cors from "cors";

app.use(cors());
And errors go to sleep :)
Unique visits
If you refresh this blog page the counter I added at the top will increment, it will increment as many times you refresh. We will look how can you make it so that only unique visits increase the counter. We will also look into why you don’t want to that.
Why it happens
In our code we count the number of times the image is requested, every time you refresh the page image gets requested again and counter increments.
How to get unique visit
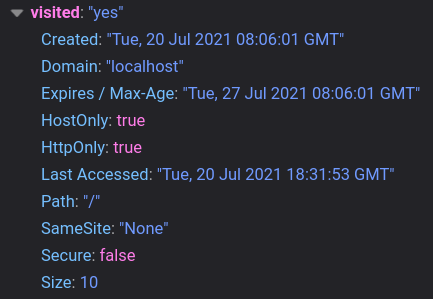
To only increment on unique visits we need to remember a user already requested the image before hence visited the page before, in that case we won’t increment the counter but will just return the current value.
The question is how do we remember that user already visited? The answer is cookies. HTTP: Hyper Text Transfer Protocol is a stateless protocol which means server doesn’t remember anything about your previous request and treats every request an independent one. Unfortunately, users don’t like to send same data again and again. The solution was cookies, You(server) collect data from users save it, and give users a ticket so next time they come you can identify them and serve their needs.
Mostly, the cookies contain unique values but we don’t need to differentiate between users we just want to know if they visited us already or not. If user already visited they will have the cookie if they didn’t they will not have the cookie. So in case they have the cookie we will deliver the counter without modification, in case they don’t have a cookie we will increment the counter send the incremented counter and also send a cookie which marking that user visited like markings you get after vacination.
Code
How do we get cookie? well cookie is in header of HTTP request by the user, you can get cookie from express getHeader but in a real project cookie-parser package should be used.
// server.ts
import * as cookieParser from "cookie-parser";

const COOKIE_NAME = "visited";

app.use(cookieParser());

app.get("/svg", (req, res) => {
  const visited = req.cookies[COOKIE_NAME];

  if (!visited) {
    // if cookie name visited doesn't exist it's a new visit

    // increase the count
    count++;

    // attach a cookie named visited
    res.cookie(COOKIE_NAME, "yes", {
      httpOnly: true,
    });
  }
  res.setHeader("content-type", "image/svg+xml");
  res.send(createCounterSvg(count));
});
Why you don’t want to use unique visits
If you plan to use it for multiple counter by linking with a database
Example: when you request example.com/svg/1 counter 1 is returned and example.com/svg/2 returns counter2. As counter 1 and counter2 will have different cookies to work correctly. You can use array as value of cookie to determine which paths user requested earlier i.e. your cookie will look like visited=[1,2,3...] but this approach is not scalable if you want to make something available to all, it might be good enough for personal use though.
Hacks
- You can keep requesting the image by refreshing or get request to the URL this will increase the counter.
- You can use somebody else’s counter on your profile. Below I use ryanlanciaux’s counter, the author of the counter in start of this blog.

- Less cheaty way You can just share counter with your friend(s) and it will show total profile visits of you and your friends.
I am not going to detail you how to do that, learn yourself.
Conclusion
It was fun learning and applying while making this project, but the question is can we use this for real. The answer is… it depends. If you want just one counter it’s good to go, if you want multiple counters you will have to tinker with the code a bit to make it work.
Why do you want to host it? Well if you want an image with distinct design, go ahead.
Maybe, I will post the updates with database integration for multiple images, and possibly an option to upload your own designs.
You can find the source code on the github repo backend-basics.